My cousin sent me a 47-second video last year — smooth transitions, punchy text overlays, a trending audio track timed perfectly to the cuts. I assumed she’d hired someone or spent hours in Premiere Pro.
She hadn’t. She made it on her phone during a bus ride using CapCut.
That was the moment I finally downloaded it. And honestly? I wish I hadn’t waited so long.
What Even Is CapCut (And Why Should You Care)?
CapCut is a free video editing app made by ByteDance — the same company behind TikTok. It’s available on Android, iOS, Windows, and Mac, and there’s also a web version if you prefer editing on a browser. It launched in 2020 and has quietly become one of the most downloaded video editors on the planet, especially among content creators who don’t have the time (or budget) for professional software.
But here’s the thing — it doesn’t feel like a “budget” tool. The features are genuinely impressive, and the learning curve is surprisingly gentle. I’ve used Adobe Premiere, DaVinci Resolve, and even iMovie at different points. CapCut slots somewhere between iMovie’s simplicity and Premiere’s capability — which is a weirdly sweet spot.
My First Week With CapCut: Honest Impressions
I downloaded it thinking I’d use it once or twice for Instagram Reels. A week later, I was using it for everything — product demos, travel clips, even quick tutorial videos for work.
The interface is clean. When you open a project, your timeline sits at the bottom, your preview is front and center, and the editing toolbar slides along the bottom. It took me maybe 20 minutes to feel comfortable navigating it.
The first thing I noticed was how fast it loads clips. I imported a 4K video shot on my iPhone 14 Pro, and CapCut handled it without freezing or dropping frames in the preview. That alone put it ahead of a few desktop apps I’ve tested.
The Features That Actually Matter
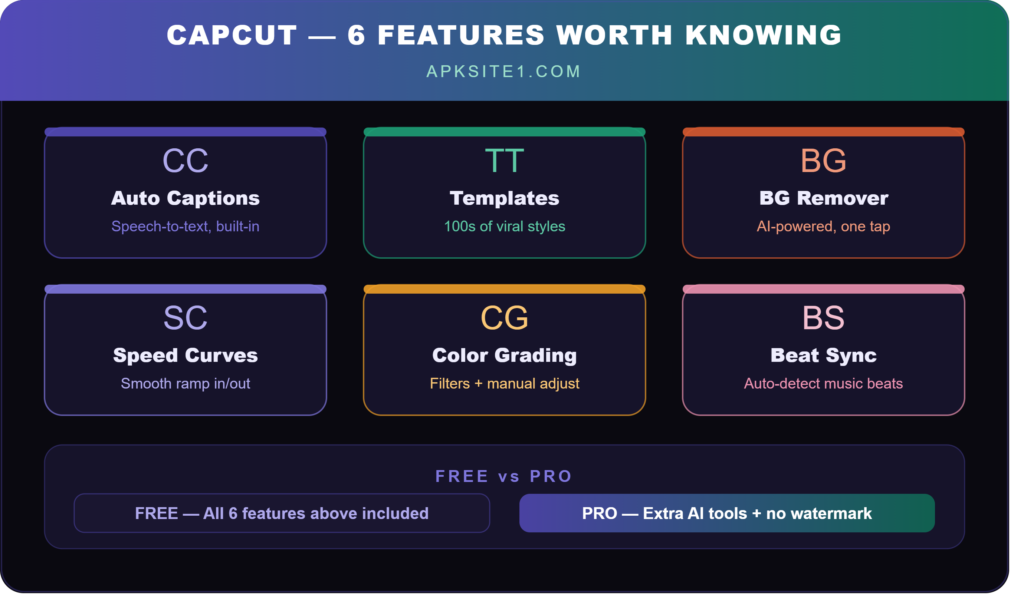
Auto Captions (Genuinely Useful)
This is one of those features I’d have paid for separately. CapCut transcribes your speech and generates subtitles automatically. The accuracy for English is solid — not perfect, but close enough that you’re doing light correction rather than rewriting everything.
For someone who posts Reels or YouTube Shorts, this alone saves 15–20 minutes per video.
Templates — The Fast Lane
If you’ve ever seen a viral TikTok with a specific editing style and thought “how did they do that?” — chances are they used a CapCut template. The app has hundreds of them, and they’re stupidly easy to use. You pick a template, swap in your clips, and it syncs everything to the music automatically.
I used one for a birthday video for a friend. Total editing time: four minutes. She thought I’d spent hours on it.
One heads-up though: some templates are so common that your video will look like everyone else’s. If you’re building a brand or want a distinct style, treat templates as a starting point, not a final product.
Text Animations and Stickers
The text options are far more varied than what you get in most free apps. You can pick from dozens of animation styles — fade, bounce, typewriter, glitch — and the typography choices are decent. Not Adobe-level typography control, but workable.
Stickers are hit or miss. The animated ones can look fun or they can make your video look cluttered fast. I learned the hard way that less is almost always more.
Background Remover (The One That Surprised Me)
CapCut has an AI background remover built in. I used it to pull myself out of a messy room background for a quick product video. It worked better than I expected — clean edges, minimal ghosting. On a subject with straightforward hair and clear contrast against the background, it’s genuinely impressive.
On curly hair or complex backgrounds? It struggles a bit. Manageable, but you’ll need to touch it up manually.
Speed Controls and Curves
You can do basic speed adjustments (slow motion, fast forward), but CapCut also has speed curve controls — meaning you can ramp in and out of slow motion smoothly within a single clip. This is a feature you’d expect from professional software, and it’s here, working cleanly, for free.
Step-by-Step: Editing a Short Video From Scratch
Here’s how I typically put together a 30–60 second Reel or Short using CapCut:
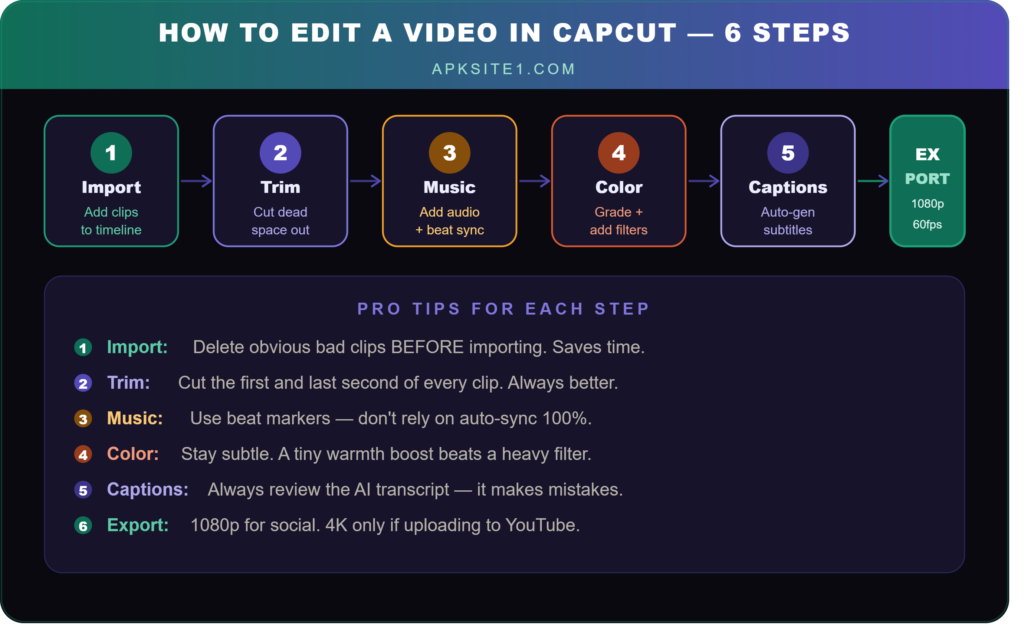
Step 1 — Import your clips. Tap “New Project,” select your clips from your camera roll. Drag to reorder them in the timeline if needed.
Step 2 — Trim the fat. Tap a clip, grab the edge handles, and trim the dead space at the start and end of each clip. This alone improves almost every video.
Step 3 — Add music or audio. Tap “Audio” at the bottom toolbar. You can pull from CapCut’s library (most tracks are licensed for commercial use on social platforms), extract audio from another video, or import from your device. Sync cuts to the beat using the “Beat” detection feature — it places markers automatically.
Step 4 — Color grading. Tap “Adjust” or “Filter.” I usually stay subtle here — bump the brightness slightly, add a tiny bit of contrast, maybe a gentle filter. Heavy-handed color grading makes amateur videos look… more amateur.
Step 5 — Add captions (if it’s a talking video). Tap “Text” → “Auto Captions.” Let it process, then review and correct any errors. Change the font and color to match your style.
Step 6 — Export. Tap the export button (top right), choose your resolution (I default to 1080p unless it’s YouTube, where I’ll push 4K), and let it render. Export is quick — most short videos render in under 30 seconds.
Mistakes I Made (So You Don’t Have To)
Using too many effects at once. I went through a phase of stacking transitions, stickers, text animations, and color filters all in one video. It looked chaotic. Most good videos on social media are more restrained than you think.
Ignoring the aspect ratio setting. CapCut defaults to 9:16 (vertical), which is great for Reels and TikTok but wrong for YouTube or horizontal content. Check this before you start editing — changing it midway is a pain.
Over-relying on auto-sync with music. The beat sync feature is useful, but it places cuts mechanically. Sometimes the best cut doesn’t land on the beat — it lands a beat early, or mid-phrase. Use auto-sync as a guide, then adjust manually.
Not organizing my clips first. When I have 30+ clips to work through, dropping them all in the timeline at once creates a mess. Now I preview and delete obvious rejects before importing into CapCut. Saves time every time.
CapCut Pro: Is It Worth It?
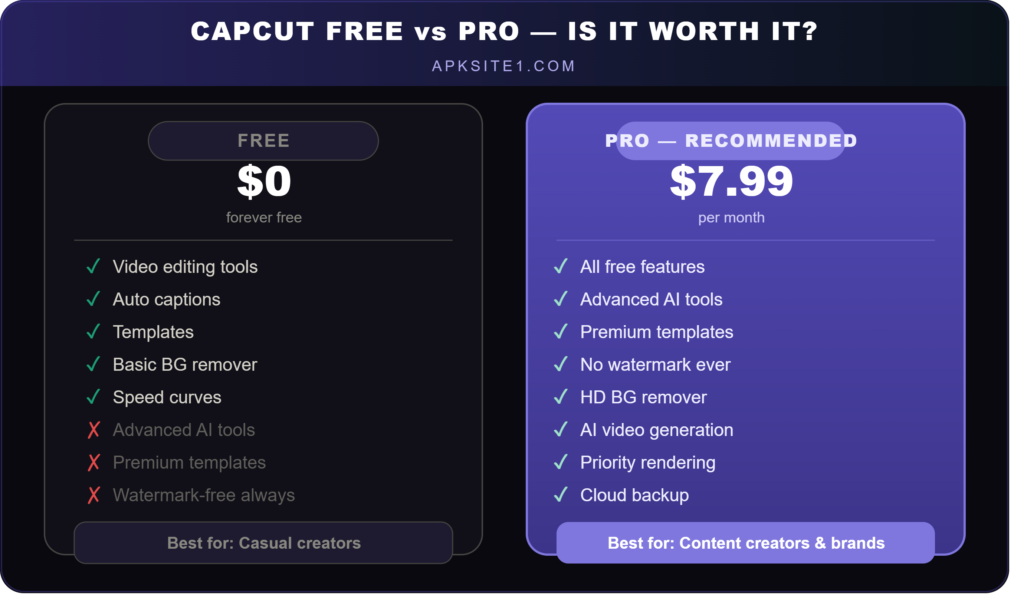
There’s a paid “Pro” tier with additional features — more AI tools, certain premium templates, advanced effects, and removal of the watermark on some export options.
Honest take: if you’re a casual creator, the free version is enough. The watermark only appears if you export at certain settings — most social media exports come out clean without it. If you’re using CapCut professionally or need the extra AI features like AI-generated video or the more advanced background removal, the Pro plan makes sense. But don’t feel pressured into it starting out.
Who Is CapCut Actually For?
CapCut is built for a specific type of creator: someone who wants results fast, doesn’t have hours to spend learning complex software, but still wants their video to look polished.
If you’re a working videographer doing client work, you’ll probably still want DaVinci Resolve or Premiere for the granular control. But for social media content — TikTok, Instagram Reels, YouTube Shorts, even LinkedIn videos — CapCut handles the job faster than anything else I’ve tried.
I’ve recommended it to small business owners making their own content, to people documenting travel, to teachers making explainer clips, and to parents who want to make nice birthday videos. It works across all of those use cases without complaint.
The Stuff That Bugs Me
No tool is perfect. A few things still annoy me about CapCut:
The cloud sync can be unreliable. I’ve had projects not restore properly when switching devices, which was frustrating when I was mid-edit.
Some advanced features (especially the newer AI ones) feel like they’re being added faster than they’re being polished. A few of the AI tools are inconsistent — great one time, weird results the next.
The mobile interface is excellent, but the desktop app feels slightly behind. It works, but it’s clear the mobile version gets more love.
To download app visit here,
Final Thoughts
CapCut solved a problem I didn’t fully realize I had: I wanted to make better videos without spending my evening learning software. It delivers on that in a way that felt almost surprising the first time I used it seriously.
It’s not going to replace professional tools for professional work. But for the kind of video most people actually make — short, social, shot on a phone — it’s hard to beat. The free version is genuinely generous, the learning curve is real but gentle, and the results look better than the effort you put in.
If you’ve been putting off learning video editing because it seems complicated, CapCut is probably the right place to start.