

Sell stock photos online — that’s the exact phrase I typed into Google back in early 2024, sitting on my bed at 1 AM with about 400 half-decent photos sitting in a folder called “New Folder (3)” that I never bothered to rename.
I wasn’t a photographer. I still don’t call myself one. I just had a decent phone camera, a cheap Canon I’d bought secondhand for a trip two years earlier, and a habit of taking way too many pictures of food, coffee shops, laptops, and random street scenes because I liked how they looked.
Turns out, that “useless” folder of photos was worth more than I thought. Not life-changing money. Let’s get that out of the way right now — nobody’s quitting their job over this. But it’s real, it’s genuinely passive after the upload work is done, and it kept surprising me for months with tiny deposits I’d completely forgotten were coming.
Here’s exactly what I did, what I got wrong, and how you can actually start this weekend if you want to.
How I Started Selling Stock Photos Online (And What I Got Wrong First)
My first mistake was assuming quality didn’t matter that much. I uploaded 60 photos to Shutterstock in one go — blurry backgrounds, weird crops, a few with visible logos I didn’t blur out. About 40 got rejected in the first review. That stung a little, not going to lie.
The rejection emails actually explain why, though, which is more useful than it sounds. Common reasons I kept seeing: focus issues, noise/grain in low light shots, recognizable brand logos, and “isolated on white” requests I didn’t know were even a category buyers search for.
So I slowed down. I reshot some of my flat-lay coffee shots with actual natural window light instead of my kitchen ceiling bulb. I started using my phone’s grid lines to keep horizons straight. Small stuff, but it made a real difference in acceptance rates.
The Platforms That Actually Paid Me
I didn’t stick to one site. Different platforms have different audiences, and diversifying is honestly the whole game if you want this to add up to something.
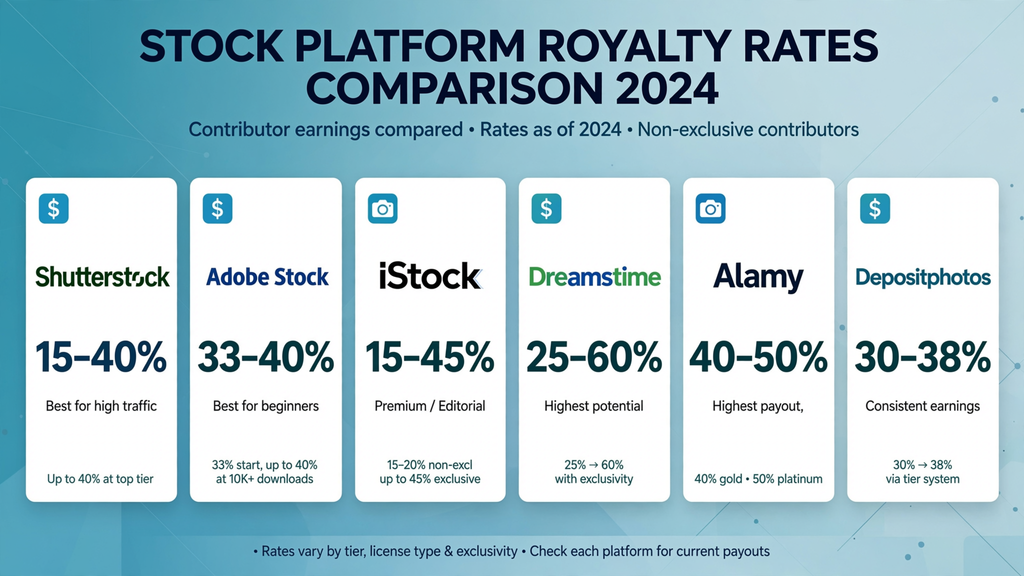
Here’s a rough breakdown of what I’ve used and roughly what each one pays out, based on my own contributor dashboards and the current published rates on each site (these move around, so always check the live numbers before you commit):
| Platform | Typical Royalty Rate | Approval Difficulty | Best For |
|---|---|---|---|
| Shutterstock | 15%–40% (rises with volume) | Moderate | High traffic, steady sales |
| Adobe Stock | ~33% flat | Easier for beginners | Fast approval, good for new contributors |
| iStock/Getty | 15%–45% (exclusivity-based) | Strict | Higher-paying premium buyers |
| Dreamstime | 25%–50% | Easier | Good secondary income stream |
| Alamy | 40%–50% | Moderate | Editorial and travel shots |
| Depositphotos | ~34%–42% | Moderate | Wide buyer base, decent volume |
Adobe Stock was where I saw movement fastest — probably because it’s tied into their whole Creative Cloud ecosystem, so there are just more buyers browsing at any given moment. Alamy took the longest to approve me (almost three weeks), but the editorial-style photos I had — random street shots, local markets, that kind of thing — did better there than anywhere else.
Step-by-Step: How to Actually Sell Stock Photos Online
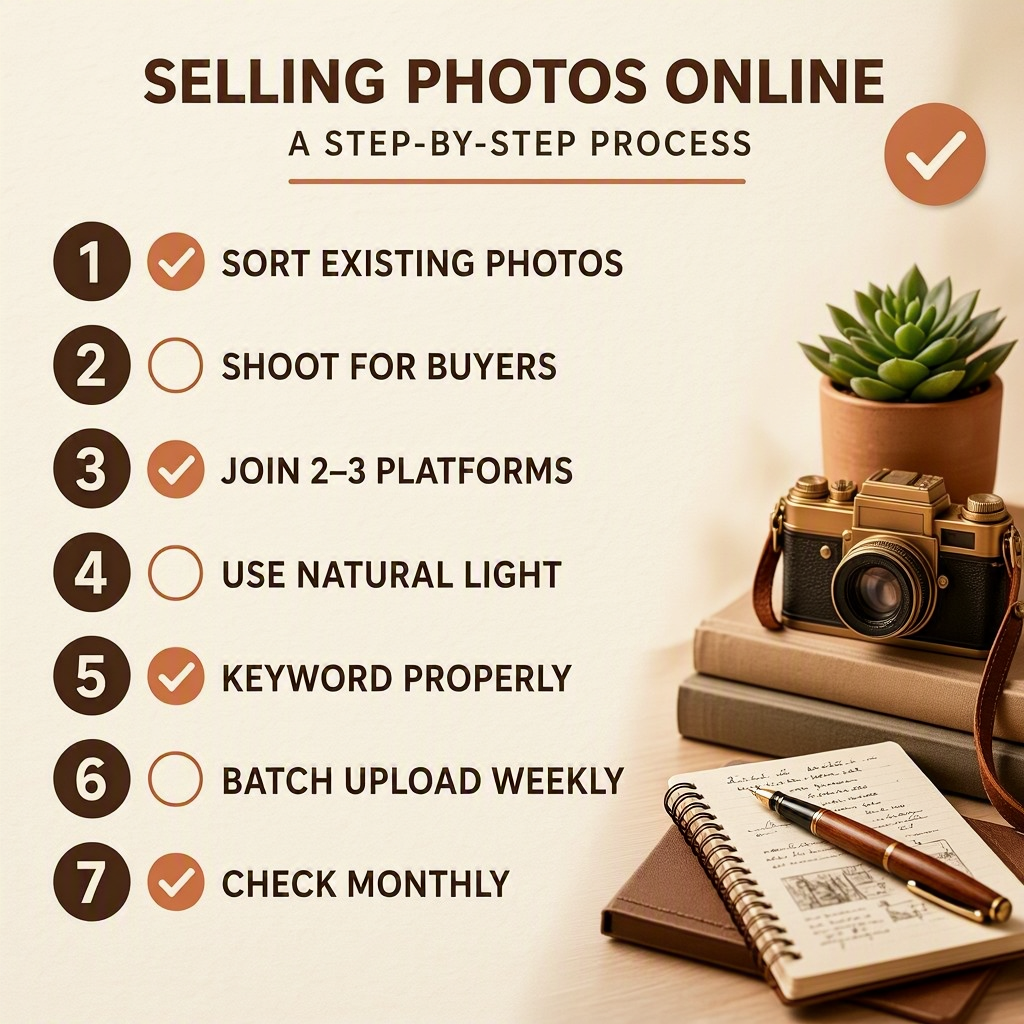
If you want to skip the trial-and-error I went through, here’s the actual process:
- Sort your existing photos first. Before buying anything new, go through what you already have. Look for clean shots without people’s faces (unless you have model releases), no visible logos, and decent lighting. You’d be surprised what’s sitting in your camera roll already.
- Shoot with buyers in mind, not just yourself. Buyers search for concepts — “remote work,” “healthy breakfast,” “small business owner,” “stressed student.” Generic, useful, relatable scenes sell way more than artistic personal shots.
- Sign up for 2–3 platforms, not just one. I started with just Shutterstock and left money on the table for months before adding Adobe Stock and Dreamstime.
- Use natural light whenever possible. This alone fixed most of my early rejections. A window and an overcast day beats a ring light most of the time for realistic shots.
- Keyword your uploads properly. Each platform lets you tag photos with keywords. Be specific and honest — “woman working laptop cafe morning” beats just “work.”
- Batch upload once a week. Doing five photos a day burns you out. I found uploading 20–30 at once, once a week, kept momentum without becoming a chore.
- Check your dashboard monthly, not daily. Passive income doesn’t mean instant. Checking daily just stresses you out over $0.38 sales. Monthly check-ins keep it sane.
What Actually Sells (Based On My Own Sales Data)
Here’s the honest surprise: my “nice” photos didn’t sell as well as my boring ones.
A slightly awkward photo of someone typing on a laptop with a coffee cup half out of frame outsold my carefully composed sunset shots by a wide margin. Buyers — mostly blogs, small businesses, and marketing teams — want photos that look real and usable, not gallery-worthy.
Things that consistently sold for me:
- People using technology in everyday settings (not posed)
- Empty office/desk setups
- Food that looks homemade, not styled
- Local city or street scenes without recognizable landmarks
- Simple textures and backgrounds (wood, marble, fabric)
Things that barely sold at all:
- Landscape/nature shots (oversaturated category, tons of competition)
- Heavily edited or filtered photos
- Anything with visible text or branding

Common Mistakes People Make Selling Stock Photos Online
I made most of these myself, so consider this the shortcut version:
- Not getting model releases. If a real, identifiable person is in your photo, you legally need a signed release or it gets rejected (or worse, taken down after being live).
- Ignoring metadata and keywords. A great photo with lazy keywords just won’t get found in search.
- Uploading once and forgetting about it. Consistency matters. Accounts with regular new uploads tend to get more visibility in platform algorithms.
- Expecting fast money. My first real payout month wasn’t until month four. It’s a slow build, not a quick flip.
- Only shooting for yourself. Beautiful isn’t the same as sellable. Think about what a small business owner or blogger actually needs for their website.
Is Selling Stock Photos Online Actually Worth It?
Honestly? If you’re expecting a full income replacement, no. Most contributors earn somewhere between pocket money and a small side income unless they’re uploading hundreds of photos consistently over years, or shooting specifically in-demand categories like business, healthcare, or tech.
But if you already take photos for fun, or you have a phone and a bit of patience, it costs nothing to try. The photos I took two years ago are still earning me small amounts today, without me doing anything further. That’s the part that actually makes it worth it — the work is front-loaded, and the payouts keep trickling in long after.
If you want a legitimate place to start, Adobe Stock’s contributor program is one of the more beginner-friendly options I’ve used, with a straightforward submission process.
FAQs
Do I need an expensive camera to sell stock photos online?
No. Plenty of my accepted photos were shot on a mid-range phone. What matters more is lighting, focus, and composition, not the gear.
How long does it take to get approved on stock photo sites?
It varies. Adobe Stock reviewed my submissions within about 48 hours. Alamy took closer to three weeks for account approval.
Can I sell the same photo on multiple stock sites?
Yes, unless you specifically opt into an “exclusive” contributor agreement on a platform like iStock, which restricts you to selling there only in exchange for higher royalty rates.
Do I need to pay taxes on stock photo income?
In most cases, yes — treat it as self-employment or additional income depending on your country’s rules, and keep basic records of your payouts.
What’s the biggest reason photos get rejected?
In my experience, it’s technical issues — noise, poor focus, or bad lighting — far more often than the actual subject matter.
For more information, visit: APKSITE1